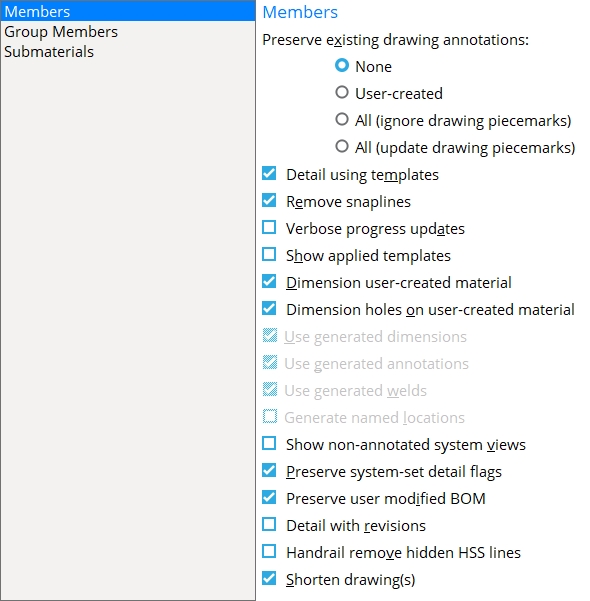
The links shown above for Members take you to documentation for the Member Annotations and Dimensioning window. That window opens when you Detail Members, then select one or more members on the member selection dialog, and then press the Settings button.
The settings for Members on this screen set the default choices that you will find on that window. When you Detail Members for the first time, choices on the Member Annotations and Dimensioning window will exactly match the choices made here on this screen.
Be aware that these defaults are set on a per-Fabricator basis. When you Detail Members, you will get the defaults that are set for your current Fabricator.
After a member is detailed for the first time (or after the Member Annotations and Dimensioning window is opened for the first time), the settings on that window are stored with the member, and this screen will no longer affect the choices made on that window unless you press that window's Default button.
If you press the Default button on the Member Annotations and Dimensioning window, that window will automatically be populated with the default settings entered on this screen. You might apply these defaults from setup, for example, if you want to re-detail a number of member details in a particular way that is different from the way that they were originally detailed.
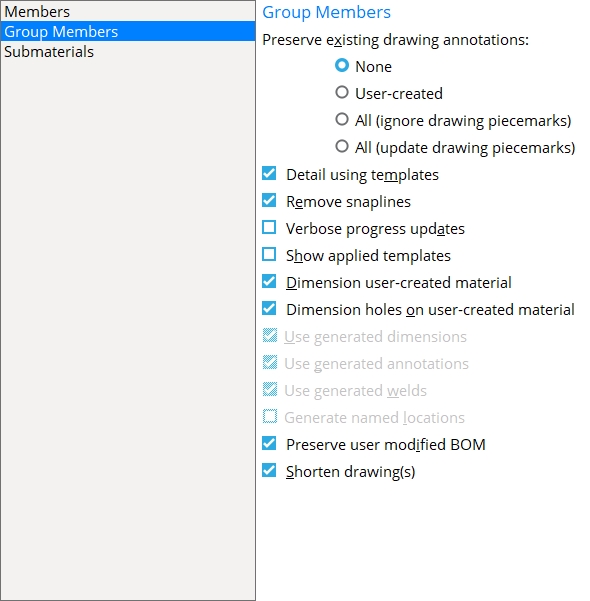
Settings for Group Members on this screen set the default choices that you will find on the Group Member Annotations and Dimensioning window. When you Detail Member Groups for the first time, choices made on the Group Member Annotations and Dimensioning window will exactly match the choices made here on this screen.
Be aware that these defaults are set on a per-Fabricator basis. When you Detail Member Groups, you will get the defaults that are set for your current Fabricator.
After a group member is detailed for the first time (or after the Group Member Annotations and Dimensioning window is opened for the first time), the settings on that window are stored with the group member, and this screen will no longer affect the choices made on that window unless you press that window's Default button.
If you press the Default button on the Group Member Annotations and Dimensioning window, that window will automatically be populated with the default settings entered on this screen. You might apply these defaults from setup, for example, if you want to re-detail a number of group member details in a particular way that is different from the way that they were originally detailed.
Submaterial
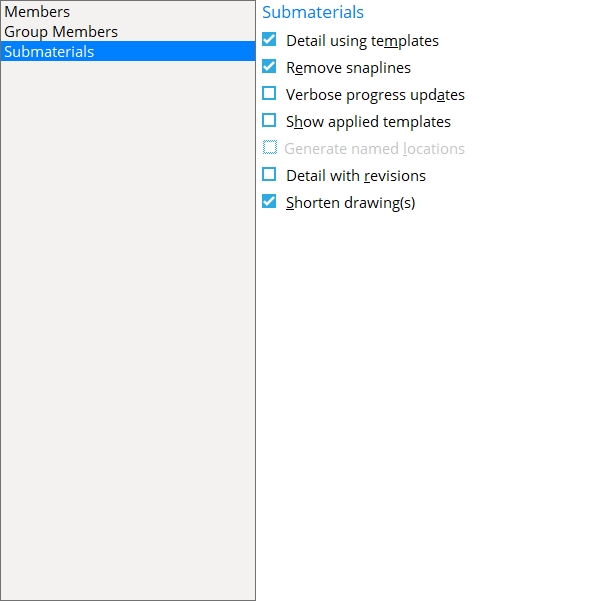
The links shown above for Submaterial take you to documentation for the Submaterial Annotations and Dimensioning window. That window opens when you Detail Submaterial, then select one or more submaterials on the submaterial selection dialog, and then press the Settings button.
The Submaterial settings applied on this screen set the default choices made to the Submaterial Annotations and Dimensioning window. When you Detail Submaterial for the first time, choices made on the Submaterial Annotations and Dimensioning window will exactly match the choices made here on this screen.
Be aware that these defaults are set on a per-Fabricator basis. When you Detail Submaterial, you will get the defaults that are set for your current Fabricator.
After submaterial is detailed for the first time (or after the Submaterial Annotations and Dimensioning window is opened for the first time), the settings on that window are stored with the submaterial, and this screen will no longer affect the choices made on that window unless you press that window's Default button.
If you press the Default button on the Submaterial Annotations and Dimensioning window, that window will automatically be populated with the default settings entered on this screen. You might apply these defaults from setup, for example, if you want to re-detail a number of submaterials in a particular way that is different from the way that they were originally detailed.
The position of these form buttons on the screen tells you what settings they apply to. Click here for more information.
You can Copy the settings on this screen, then Paste those settings to a different screen of the same type.
You can Save the settings on this screen to a global folder that is used by your current version of SDS2. Give the file a name that will help other users identify its purpose. You can Load a saved file to replace the settings on this screen with the settings that are stored in the file you select.
When editing multiple screens at the same time, Paste and Load replace mixed entries to a single field with a single entry. Copy and Save ignore fields with mixed entries, treating them as if they have no entry or do not exist.
OK (or the Enter key) closes this screen and applies the settings.
Cancel (or the Esc key) closes this screen without saving any changes.
Reset undoes all changes made to this screen since you first opened it. The screen remains open.